Hey there, globetrotters! Let’s dive straight into one of the most iconic hubs of international travel: JFK Terminal 4. If you’re planning a trip through this bustling terminal, having a solid grasp of its layout is crucial. Whether you’re rushing to catch a flight or just looking to make the most out of your layover, understanding the terminal 4 map can save you time, stress, and maybe even a few bucks. So, buckle up because we’re about to break it down for you step by step.
JFK Terminal 4 is more than just a transit point; it’s a gateway to the world. Operated by the Port Authority of New York and New Jersey, this terminal serves as the primary hub for international flights. But let’s be honest, navigating a massive terminal can feel like solving a puzzle. That’s why we’ve created this comprehensive guide to help you master the terminal 4 map like a pro.
From check-in counters to baggage claim areas, lounges, dining spots, and everything in between, we’ll cover it all. This guide isn’t just about showing you where to go; it’s about making sure you get there smoothly. Let’s make sure your journey through JFK Terminal 4 is as seamless as possible. Ready? Let’s go!
Read also:Cooper Jacob Morrow The Rising Star Redefining Hollywoods Landscape
Table of Contents
- Terminal 4 Overview
- Check-In Process and Counters
- Navigating Security: Tips and Tricks
- Gate Locations and Layout
- Dining and Shopping Options
- Lounges and Relaxation Zones
- Baggage Claim Areas
- Transportation Options
- Activities During Layovers
- Pro Tips for Travelers
Terminal 4 Overview: What You Need to Know
Alright, let’s kick things off with the big picture. JFK Terminal 4 is one of the largest terminals at John F. Kennedy International Airport, and it’s designed to handle the complexities of international travel. It’s home to several major airlines, including Delta Air Lines, Emirates, and Cathay Pacific, among others.
One of the standout features of terminal 4 is its modern design. The terminal boasts a spacious layout with state-of-the-art facilities. Whether you’re arriving or departing, you’ll notice the attention to detail in its architecture and functionality. But let’s not forget, size can sometimes mean complexity. That’s where the JFK terminal 4 map comes in handy.
Pro Tip: Always double-check your boarding pass for the correct terminal. JFK has multiple terminals, and mistakenly heading to the wrong one can cause unnecessary delays.
Fun Facts About JFK Terminal 4
- Opened in 2001, it was the first new international arrivals terminal built at JFK since the 1970s.
- It underwent a massive renovation in 2013, expanding its capacity to accommodate more passengers and airlines.
- It features over 30 gates, making it one of the largest terminals at JFK.
Check-In Process and Counters
Now that you’ve got the overview, let’s zoom in on the check-in process. JFK Terminal 4 check-in counters are spread across two levels: the arrivals level (Level 1) and the departures level (Level 4). Depending on your airline, you’ll either check in on the arrivals level or proceed directly to the departures level.
For most international flights, you’ll need to check in at Level 1. This is where you’ll find the main check-in counters for airlines like Delta, Emirates, and Etihad Airways. Once you’ve checked in, you’ll proceed to security and then head up to Level 4 for boarding.
Key Points:
Read also:Camilla Arauacutejo Leaks The Truth Behind The Sensation
- Check-in opens approximately 3-4 hours before departure.
- Baggage drop-off is available at the check-in counters.
- Some airlines offer self-service kiosks for faster processing.
Tips for a Smooth Check-In
Here’s a little insider info: arrive early, especially during peak travel seasons. Security lines can get long, and the last thing you want is to miss your flight because you underestimated the wait times. Also, if you’re checking in heavy luggage, make sure to account for additional time as the process can be slower.
Navigating Security: Tips and Tricks
Security checkpoints are a crucial part of the travel experience, and JFK Terminal 4 has its fair share of them. The TSA PreCheck lanes are available, and they can significantly reduce your wait time. However, not everyone is eligible for PreCheck, so it’s essential to know what to expect.
When you approach the security checkpoint, you’ll notice that the process is fairly standard: remove your laptop, liquids, and any metal items from your carry-on. But here’s a secret: the terminal 4 map often highlights the busiest and least crowded security lanes. Use this info to your advantage and save yourself some time.
Security Checklist:
- Arrive at least 2-3 hours before your flight for international departures.
- Have your ID and boarding pass ready.
- Wear easily removable shoes to speed up the process.
TSA Regulations You Should Know
Did you know that the TSA has specific rules about liquids and electronics? Liquids must be in containers of 3.4 ounces or less, and all containers must fit into a single quart-sized bag. Electronics like laptops and tablets may need to be removed from your bag for scanning. Stay informed to avoid any hiccups.
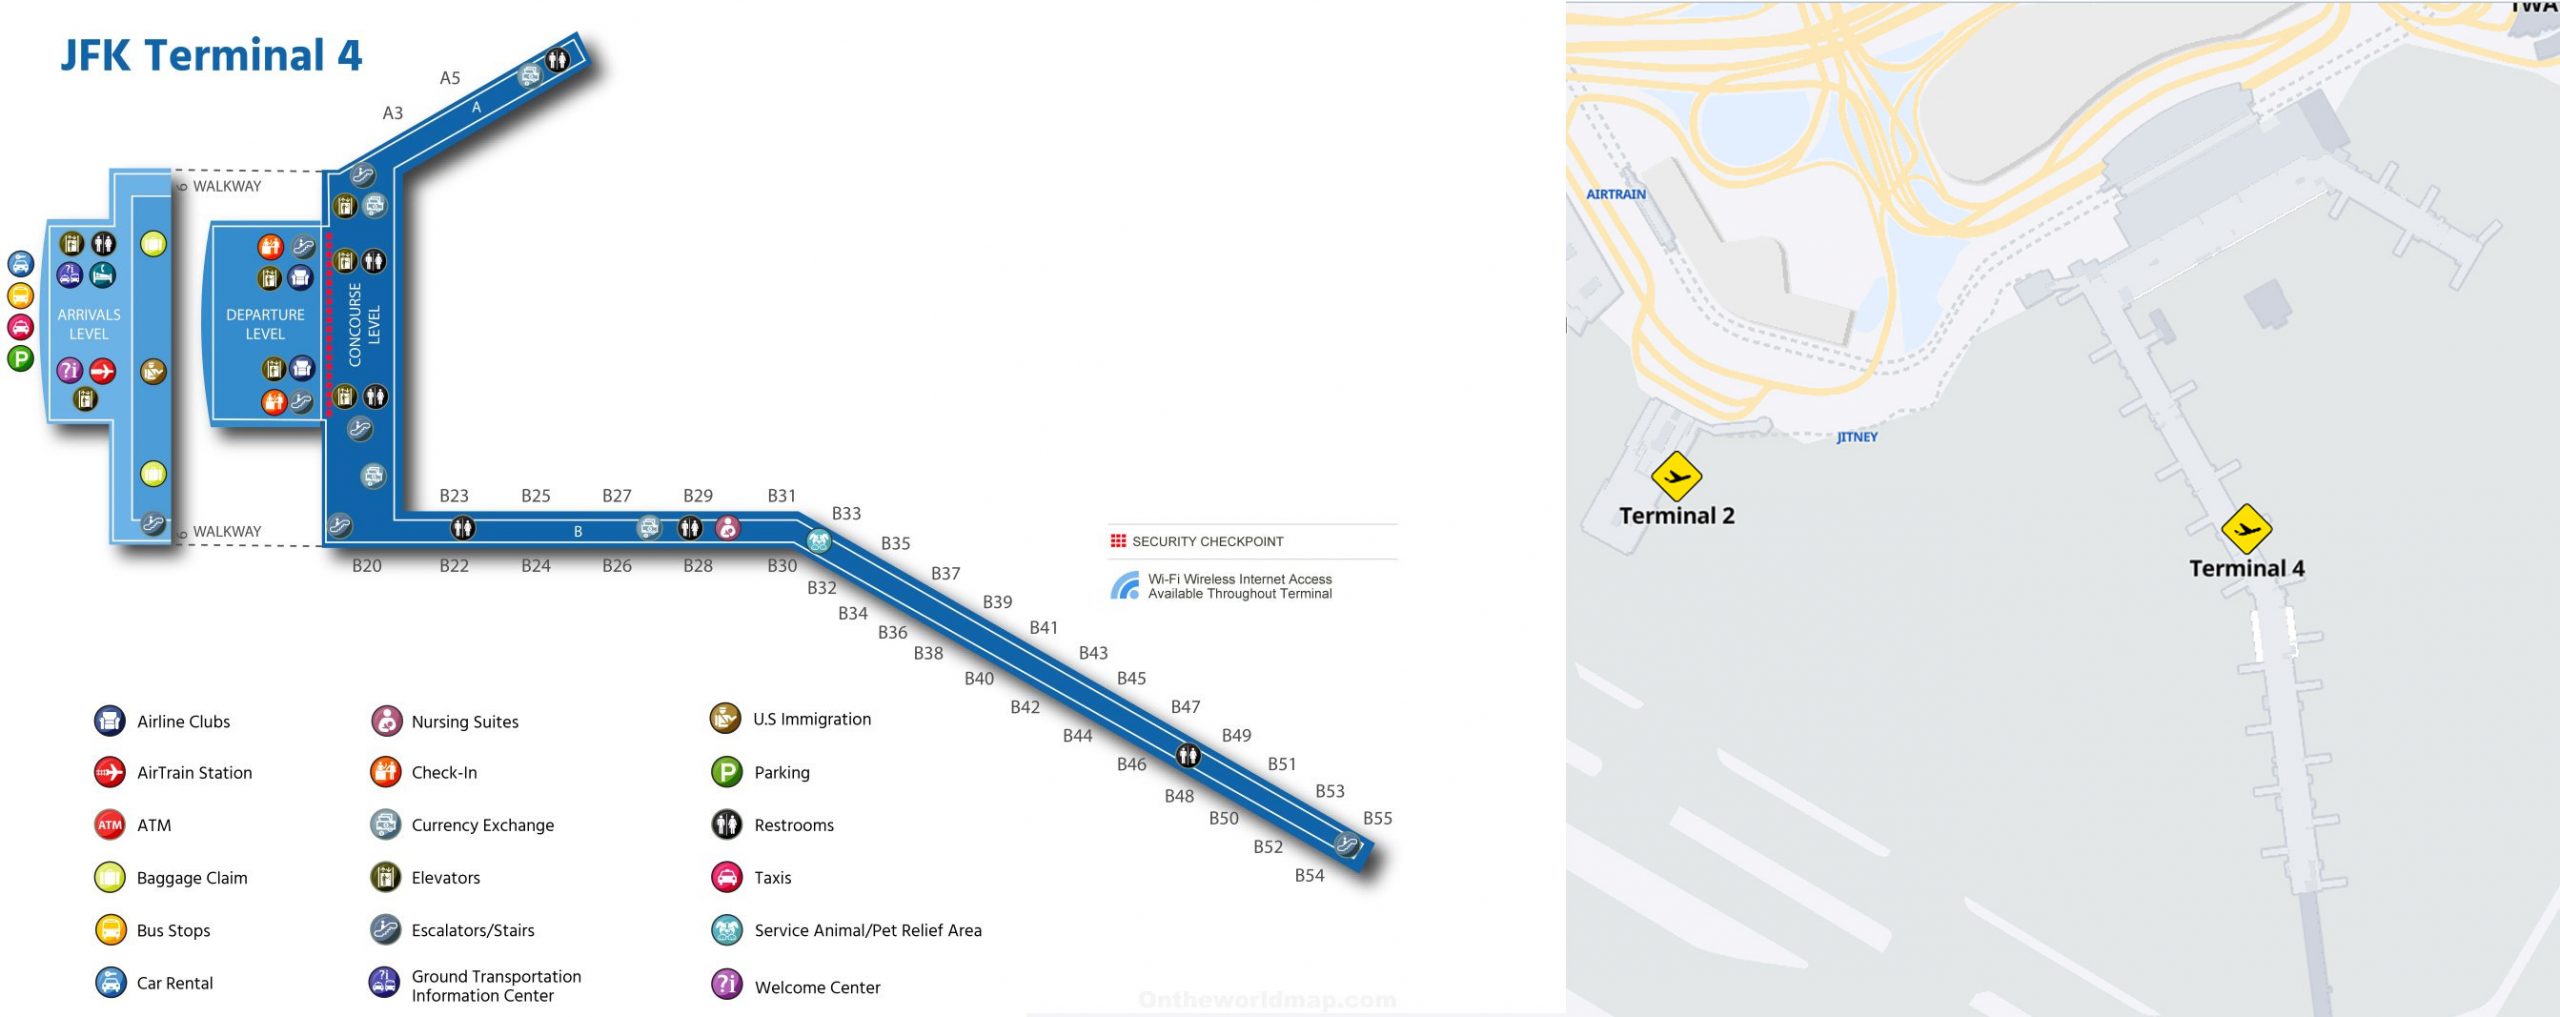
Gate Locations and Layout
Alright, here’s the meat and potatoes of the terminal 4 map: the gate locations. The terminal is divided into three concourses: A, B, and C. Each concourse houses multiple gates, and they’re connected by moving walkways and escalators. Let’s break it down:
- Concourse A: Gates A1-A16 – Primarily used by Delta Air Lines and its partners.
- Concourse B: Gates B1-B20 – Serves airlines like Emirates, Etihad, and Virgin Atlantic.
- Concourse C: Gates C1-C16 – Used by Cathay Pacific, Air France, and other international carriers.
Proximity matters! If you’re connecting to another flight, knowing which concourse your next gate is located in can help you plan your transfer more efficiently.
Gate-Specific Tips
Here’s a quick rundown of what to expect at each concourse:
- Concourse A has a great selection of dining options, perfect for a pre-flight meal.
- Concourse B features a large duty-free shopping area, ideal for last-minute souvenirs.
- Concourse C offers a quiet lounge area, perfect for a peaceful pre-departure moment.
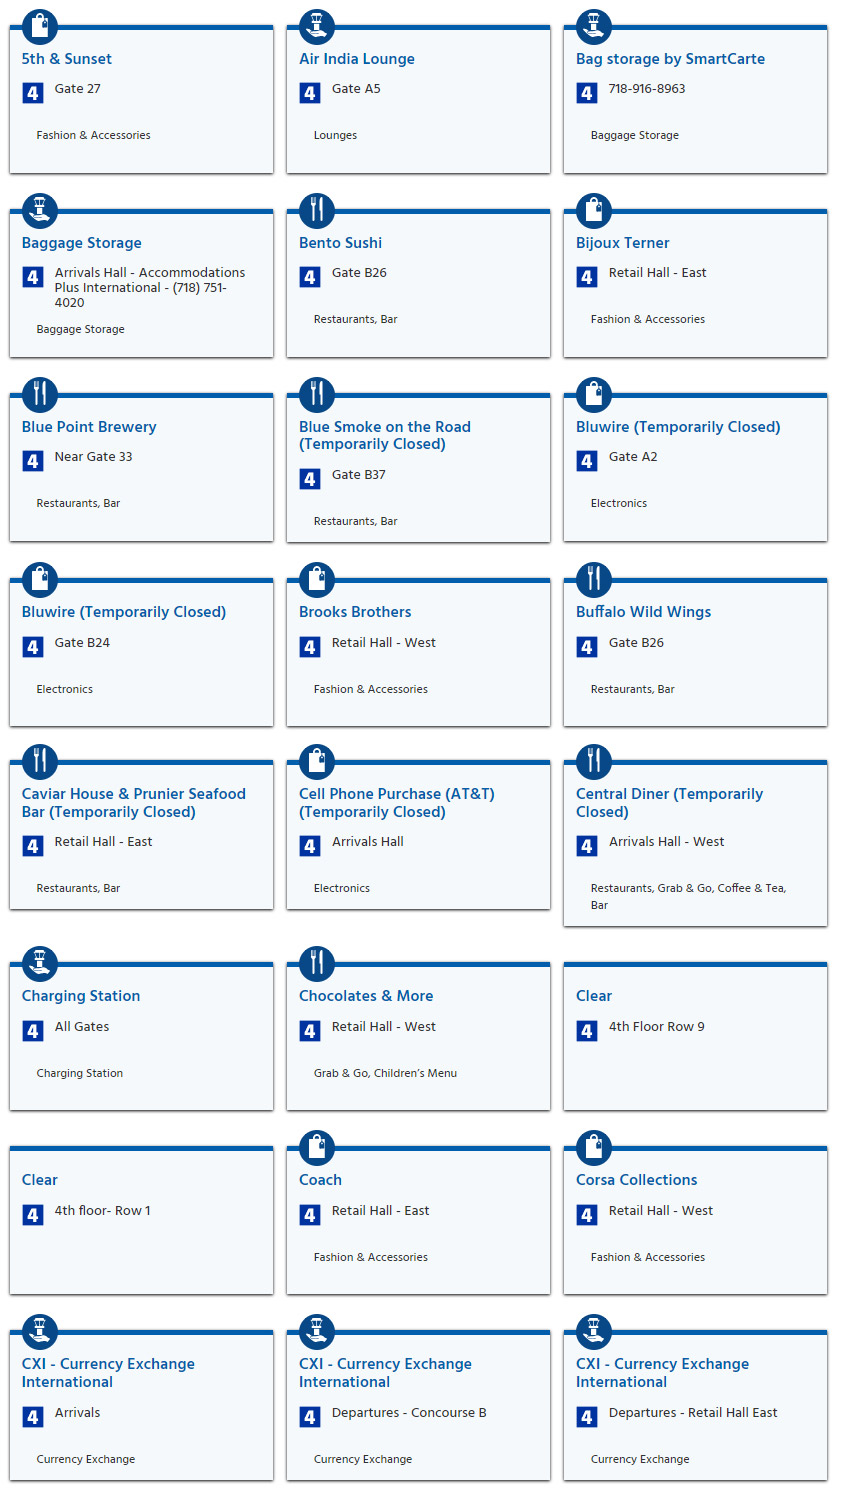
Dining and Shopping Options
Let’s talk about the good stuff: food and shopping! JFK Terminal 4 offers a wide range of dining options, from casual eateries to upscale restaurants. Whether you’re craving a quick bite or a sit-down meal, you’ll find something to suit your taste.
As for shopping, the terminal boasts an impressive selection of stores, including duty-free shops, fashion boutiques, and travel essentials. It’s the perfect place to pick up a gift or stock up on travel necessities.
Top Picks:
- The Terminal 4 Deli: A go-to spot for sandwiches and salads.
- Totto Ramen: If you’re in the mood for ramen, this place is a must-visit.
- Duty-Free Shops: Stock up on perfume, electronics, and more before you fly.
Dining and Shopping Tips
Here’s a little secret: some of the best dining options are located near the gates. Don’t be afraid to explore a bit. Also, if you’re on a budget, consider bringing your own snacks to avoid spending too much on airport food.
Lounges and Relaxation Zones
For those seeking a bit of luxury, JFK Terminal 4 has several lounges to choose from. Whether you’re a frequent flyer with elite status or just willing to splurge a little, these lounges offer a comfortable retreat from the hustle and bustle of the terminal.
Some of the standout lounges include the Delta Sky Club and the Emirates Lounge. These lounges offer complimentary food and beverages, comfortable seating, and even shower facilities for those long-haul flights.
Lounge Benefits:
- Access to premium food and drinks.
- Quiet spaces for relaxation.
- Wi-Fi and charging stations.
Tips for Accessing Lounges
Not all lounges are free, so make sure you check your airline’s policy. Some airlines offer lounge access as part of their premium ticket packages, while others require a fee. If you’re not eligible for lounge access, don’t worry – there are still plenty of comfortable seating areas throughout the terminal.
Baggage Claim Areas
Once you’ve landed, the first thing on your mind is probably your baggage. JFK Terminal 4 has multiple baggage claim areas, each corresponding to specific gates. The terminal 4 map clearly indicates which baggage claim area to head to based on your flight number.
Here’s a quick guide:
- Gates A1-A16: Baggage Claim Area 1.
- Gates B1-B20: Baggage Claim Area 2.
- Gates C1-C16: Baggage Claim Area 3.
Baggage Claim Tips
Baggage claim can sometimes be chaotic, so stay alert. Keep an eye on your surroundings and be mindful of your belongings. If your bag doesn’t appear on the carousel, don’t panic – head to the lost baggage counter for assistance.
Transportation Options
Getting to and from JFK Terminal 4 is relatively straightforward. The airport offers a variety of transportation options, including taxis, ride-sharing services, shuttles, and public transit.
Popular Options:
- AirTrain: Connects JFK to the subway and Long Island Rail Road (LIRR).
- Taxis: Available outside the terminal for a flat rate to Manhattan.
- Ride-Sharing: Services like Uber and Lyft are readily available.
Transportation Tips
Here’s a tip: if you’re traveling during rush hour, consider taking the AirTrain to avoid traffic. It’s a cost-effective and efficient way to get around. Also, always confirm the fare before getting into a taxi or ride-share vehicle.
Activities During Layovers
Got a long layover? JFK Terminal 4 has plenty to keep you entertained. From lounges and dining options to shopping and even a yoga room, there’s something for everyone.
Fun Activities:
- Explore the duty-free shops for unique finds.
- Grab a bite at one of the many restaurants.
- Unwind in the quiet lounge areas.
Layover Tips
Make the most of your layover by planning ahead. Check the terminal 4 map to see which activities are closest to your gate. This way, you can maximize your time without worrying about missing your next flight.
Pro Tips for Travelers
Before we wrap up, here are some final tips to ensure a smooth journey through JFK